This is default featured slide 1 title

Go to Blogger edit html and find these sentences.Now replace these sentences with your own descriptions.This theme is Bloggerized by Lasantha Bandara - Premiumbloggertemplates.com.

This is default featured slide 2 title

Go to Blogger edit html and find these sentences.Now replace these sentences with your own descriptions.This theme is Bloggerized by Lasantha Bandara - Premiumbloggertemplates.com.

This is default featured slide 3 title

Go to Blogger edit html and find these sentences.Now replace these sentences with your own descriptions.This theme is Bloggerized by Lasantha Bandara - Premiumbloggertemplates.com.

This is default featured slide 4 title

Go to Blogger edit html and find these sentences.Now replace these sentences with your own descriptions.This theme is Bloggerized by Lasantha Bandara - Premiumbloggertemplates.com.

This is default featured slide 5 title

Go to Blogger edit html and find these sentences.Now replace these sentences with your own descriptions.This theme is Bloggerized by Lasantha Bandara - Premiumbloggertemplates.com.

Rabu, 24 Agustus 2016

Yakitori could be a dish at your dinner table

Gambar terkait

Yakitori is grilled skewered chicken dipped in a Teriyaki-like sauce.  It is a very popular appetizer at Yakitori bars and other bar-type restaurants in Japan.

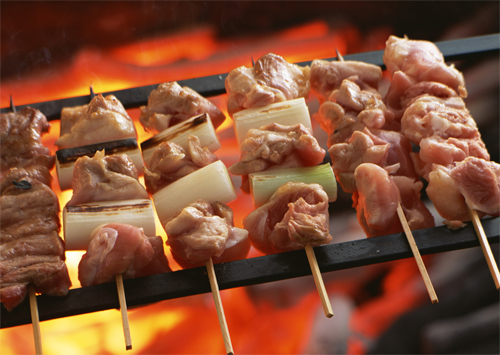
Yakitori could be a dish at your dinner table, but it is more like the food you eat with drinks at bars.  A lot of Yakitori bars grill their chicken on a charcoal grill,  and the tasty smells of grilled meat and smoke come out to the street to attract customers.  People in Japan like to go out to drink after work, and Yakitori bars are one of the most popular places to have a drink.

Yakitori bars serve very basic type of Yakitori like ours, but also there are a wide variety of skewered items there.  They use every part of a chicken for Yakitori.  They not only use chicken breast and thighs, but skin, cartilage, hearts and … well, everything else.  Yakitori is often eaten with Tare (thick sweetened soy sauce), but simple Shio (salt) seasoned Yakitori is also very popular.

If you live in Japan and would like Yakitori at home for dinner, you may certainly make it; however, you can also easily get it at many places there.  Chicken butcher shops often have Yakitori to-go that is grilled right at a little corner of the shop.  Supermarket delis also have Yakitori on-the-go just like roasted and fried chicken at supermarkets in the US.  If that’s even too much trouble :-), you can stock up with canned Yakitori (not skewered) to satisfy your spontaneous Yakitori cravings.

Yakitori Recipe
Shio (salt)
Many of us live outside Japan but would like to eat Yakitori from time to time….  Make Yakitori on a barbeque grill if you can; that’s the best.  Charcoal grill especially gives it a wonderful flavor.  When you think It is a little too much work to start a fire for a weekday dinner or anytime at all, you’re in luck,  we made a recipe using a frying pan.  It is so easy to make!

We have 2 flavorings for Yakitori here: Shio (salt) and Tare (sauce).  We like both, and hope you do too!  Just make sure your beer is super cold before you finish making it.

Yakitori Recipe
Prep Time: 25 minutes

Cook Time: 15 minutes

Yield: 9-10 skewers

Ingredients :

Hasil gambar untuk yakitori

1/2 cup soy sauce (120ml)

1/4 cup sugar (50g)

1/4 cup Sake (60ml)

1/4 cup Mirin (60ml)

1 lb chicken thighs (450g)

2 long white onions (or 5-6 green onions)

salt

vegetable oil

Hasil gambar untuk yakitori

Instructions :

Soak bamboo skewers (6" long) in water for 30 minutes.
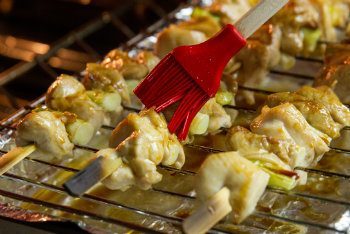
Mix soy sauce, sugar, Sake, and Mirin in a small pot, and boil for 8-10 minutes until the sauce gets a little thick. Set aside.
Cut chicken thighs into 1" cubes, and cut onions (white part) into 1" long pieces. Skewer chicken and onions alternately.
In a heated frying pan, spread oil very thinly, and cook skewered meat at medium high heat for 5 minutes. Turn and cook another 5 minutes until browned and cooked through.
Immediately dip chicken in the sauce, and serve.
Yakitori with salt
For Yakitori with salt, skewer just chicken pieces and sprinkle with salt. Cook in the same way as Yakitori with sauce (but don't dip in sauce).

Kamis, 02 Juni 2016

Kinpira Gobo is braised burdock root and carrot in a sweet and salty sauce

Kinpira Gobo is braised burdock root and carrot in a sweet and salty sauce.  This is another mom’s home cooking kind of dish rather than restaurant food.  The name Kinpira comes from legendary muscleman, and that shows how nutritious the dish really is.  Kinpira Gobo is a great side dish you can make ahead.  These strongly seasoned vegetables can be kept in the fridge up to a week.  It’s perfect for lunch and busy weekday dinners when you want one more thing for the menu.

Hasil gambar untuk Kinpira Gobo is braised burdock root and carrot in a sweet and salty sauce

Gobo is burdock root and a very popular vegetable in Japan. It is hard and looks like a tree root, but it gets quite soft when cooked and then it has a mild but distinct flavor.  Though Gobo doesn’t contain very many vitamins, it has a lot of fiber and minerals. There may be a detox effect on you if you eat regularly.  Gobo can be used in Nimono (boiled and seasoned vegetables), Miso Soup, salads, and many many more dishes. It is often cut Sasagaki (between shaved and sliced) with a knife or vegetable peeler, like when you sharpen your pencils with knife (nobody does that today!?).

Here we simply used Gobo and carrot, and try to recreate a typical Kinpira, which is hard to do because everyone likes his own mom’s Kinpira.  While Gobo and carrot are the main ingredients, you could add things like Konnyaku, lotus root, and even meat like beef or chicken. You can also spice up the dish with thinly sliced dried red chili pepper.  Some people sweeten more, and others may not use much sugar at all.  It just totally depends on each home.  Adjust the seasonings and ingredients to your liking, and make your own Kinpira Gobo for yourself!

Kinpira Gobo Recipe

Prep Time: 15 minutes

Cook Time: 10 minutes

Yield: 4 servings

Ingredients :

1 Gobo (burdock root), Sasagaki cut

1 carrot, thinly cut

Hasil gambar untuk Kinpira Gobo is braised burdock root and carrot in a sweet and salty sauce

1 Tbsp oil

1/4 C Dashi (or water)

2 1/2 Tbsp Soy Sauce

1 Tbsp sugar

1 Tbsp Sake

1 Tbsp Mirin

1 Tbsp sesame seeds

Shichimi Togarashi (red hot pepper)

Instructions :

Hasil gambar untuk Kinpira Gobo is braised burdock root and carrot in a sweet and salty sauce

Cut vegetables thinly. Let the Gobo pieces soak in water as you cut to remove the Gobo's harshness. Leave for 5-10 minutes if you have time, and strain.
Put oil in a frying pan and heat at medium high heat. Cook the Gobo for a minute or two, and add carrot and stir-fry for 2-3 minutes. Add Dashi, soy sauce, sugar, Sake, and Mirin, and cook until the liquid is almost all gone.
Add sesame seeds and stir. Serve with Shichimi pepper.

Kamis, 26 Mei 2016

Hijiki No Nimono

Hasil gambar untuk Hijiki No Nimono

Hijiki No Nimono is another home-cooking Japanese dish for everyday meals.  It is seasoned strongly so that it lasts for a longer time and is ready to eat at any time.  It is often found in bento boxes, and is a great side dish in meals any time of a day. Hijiki No Nimono is also one of the healthiest foods among Japanese food.

Hijiki is a type of seaweed and is very nutritious.  It is full of nutrients like fiber, vitamins and minerals, especially having a lot of iron. If you are concerned about healthy eating, Hijiki may be the super vegetable (from the ocean) you are looking for. Interestingly, it also has a considerable amount of arsenic for a food, but it is widely eaten in Japan and is typically not a problem as long as you don’t eat excessive amounts.

As mentioned, Hijiki No Nimono is strongly seasoned, so it is a very good accompaniment for steamed rice.  It is salty and sweet, and a tasty side dish for any time.

Hijiki No Nimono

Prep Time: 30 minutes

Cook Time: 20 minutes

Ingredients :

Hasil gambar untuk Hijiki No Nimono

1 C (50g) dried Hijiki

1/2 medium carrot

1/2 slab Konnyaku

1 rectangle or 2 squares Aburaage

1 Tbsp oil

4 Tbsp soy sauce

2 Tbsp sugar

1 Tbsp Sake

1 Tbsp Mirin

Instructions :

Rehydrate dried Hijiki in water in a bowl about 30 minutes. Cut carrot, Konnyaku, and Aburaage into thin 2" long strips.
Strain Hijiki and drain the water as much as you can.
Heat a frying pan with oil, and stir fry Hijiki, carrot, Konnyaku, and Aburaage together about 5 minutes. Add the seasonings and cook at medium heat for 10 minutes covered, and cook further for 5-10 minutes uncovered until the liquid is almost all evaporated.

Hasil gambar untuk Hijiki No Nimono

Jumat, 06 Mei 2016

Teppanyaki is well known in the US because of famous chain restaurants

Teppanyaki is grilled meat and vegetables prepared on a flat Teppanyaki iron grill.  The meat used in this dish is usually beef although not exclusively, and it is similar to or sometimes interchangeable with Yakiniku, grilled beef often cooked on a slotted grill. Most often Teppanyaki is eaten with a garlicky spicy dipping sauce or simple salt.  Teppanyaki can be enjoyed as a regular dinner for a family but it’s also great as a party food for bigger crowds.

Gambar terkait

Teppanyaki is well known in the US because of famous chain restaurants, which were more popular in 70s and 80s.  Cooks at the restaurants cook meat and vegetables and even rice on a large iron grill in front of customers.  The customers can enjoy watching the cooking process with chefs’ fun performance as an entertainment show along with dinner.  Teppanyaki restaurants in Japan, though have a quite different feel from those in the US.  Food is still cooked in front of customers but in a more elegant way.  Cooks try to show the smooth and skillful movement of preparing and serving food to customers.  Teppanyaki restaurants in Japan are generally pricier and nicer restaurants compared to their American counterparts due to the price of beef there.  While restaurants both in the US and Japan serve mainly larger steak cuts of beef, beef slices are used when cooking at home using a portable electric grill.  You cook meat as you eat, at the speed you eat.  (Or sometimes the Mom of a family may have to turn meat over for the whole family instead of her eating.)

If there are Japanese grocery stores near you, it is easy to find sliced beef for Teppanyaki or Yakiniku. It is thicker than the paper-thin sliced meat for Sukiyaki, such as 1/6-1/8″ (or 3-4mm). Even if there is not a Japanese supermarket near you, you can slice your own beef from a lump of chuck eye roll or boneless short ribs.  There is the dipping sauce you can buy in a bottle at the stores, but it is very easy to make at home.  The sweet, not overly, and salty, garlicky flavor sauce goes perfectly with grilled beef.  The vegetables for the dish could be your favorite ones, but we used the usual suspects such as Kabocha pumpkin, brown onions, peppers, and Shiitake mushrooms.  Sweet potatoes, carrots, and zucchini also work well.  If you don’t have a portable electric or gas grill to use at the table, cooking in a frying pan can also work.

Teppanyaki can be great for special occasions as well as regular dinner.  Get all the ingredients ready and start cooking at the dinner table.  It truly is a fun meal!


Teppanyaki Recipe

Hasil gambar untuk Teppanyaki

Ingredients :

1lb beef, sliced for Yakiniku

1 onion

1 pepper

1 zucchini

1/4 Kabocha pumpkin

8 Shiitake Mushrooms
oil

Yakiniku Sauce :

2 dried chilli peppers

1/4 cup Soy Sauce

2 Tbsp sugar

2 Tbsp Mirin

1 tsp ginger, grated

1 tsp garlic, grated

1/2 Tbsp sesame seeds

1/2 Tbsp sesame seeds, grounded

1/2 Tbsp sesame oil

Instructions :

Make Yakiniku Sauce. Slice dried chilli pepper to thin small rounds. Add all the ingredients for the sauce except sesame oil in a pot. Stir and cook until it starts to boil. Add sesame oil and stir.

Hasil gambar untuk Teppanyaki

Cut Onions in a half, then slice 1/2" thick. Cut pepper into 1/2" width. Slice zucchini and Kabocha pumpkin into 1/2" thick. Cut the stems out from Shiitake mushrooms.
Heat the electric grill at high heat with cooking oil. Start grilling vegetables that takes longer than meat. Then cook sliced meat as you eat along with the dipping sauce.

Minggu, 14 Februari 2016

Kakigori is shaved ice with flavored syrup

Hasil gambar untuk Kakigori

Kakigori is shaved ice with flavored syrup.  It is very popular during the hot and humid summer in Japan, and there are a lot of pop up Kakigori stores appearing in the season.

Hasil gambar untuk Kakigori

Although you can get shaved ice here too, usually as a snow cone in the US, Kakigori is very different from that.  Snow cones often use crushed ice or ice shaved in thicker pieces.  Japanese shaved ice is very soft and fluffy, and melts in your mouth like newly fallen snow.  It doesn’t have much crunchy texture at all. Hawaii also has a version called “shave ice” that is becoming popular in other states as well. It’s based on and very similar to Japanese Kakigori, but some of the flavorings are different.

Kakigori has many kinds of flavored syrups poured on the ice, like strawberry, lemon, melon, and simple syrup (sugar syrup).  A lot of the time, Kakigori is a pretty simple affair, ice and syrup of your choice, maybe with condensed milk on top.  That’s what you get from street vendors, food courts in shopping malls, and some restaurants like Udon shops and Okonomiyaki restaurants where they serve Kakigori during summer temporarily.  On the other hand, it gets more fancy with a lot of toppings when you go to traditional Japanese sweet shops.  Matcha syrup and Anko, sweet red beans, are the basic toppings there (called Ujikintoki), but also small mochi, sweet chestnuts, and even Matcha ice cream could be on your Kakigori.

The hardest part to make this dessert is finding a Kakigori machine.  If you are lucky to find it at Japanese stores or online, get it, and make this!  Kakigori is a fun and cool dessert to please your friends and family in summer!


Kakigori Recipe

Hasil gambar untuk Kakigori

Ingredients :

2 Tbsp Matcha green tea powder

1/2 cup (100g) sugar

150ml boiling water

ice

Anko

Dango

Instructions :

Gambar terkait

Put Matcha powder and sugar in a mixing bowl, pour in boiling water, and stir well until dissolved. Let syrup cool.

Shave ice into a bowl to make a tall mound of shaved ice, according to the instructions of Kakigori machine.

Pour 3-4 Tbsp of the Matcha syrup over the ice, put Anko and Dango on top. Serve immediately.

Sabtu, 02 Januari 2016

Kakitamajiru is a kind of Sumashijiru


Kakitamajiru is a kind of Sumashijiru, a Japanese clear soup, but with an egg. It looks similar to the famous Chinese egg drop soup, but the flavor is totally different.  Kakitamajiru is made from Dashi (or Ichiban Dashi), and it has a subtle but nice Umami (savory flavor).  The soft yellow egg and green Mitsuba, Japanese herb, look very pretty, too, giving a splash of color to a meal.

Gambar terkait

When a beaten egg is added to a hot soup, the egg poofs up.  If you add a little potato starch slurry (or corn starch) to thicken the soup, the egg floats in the soup better. Though the amount of starch is very small, it’s enough to make at  difference for the egg but you don’t even notice the thickness of the soup.  Another important tip to make a nice “flowering” egg is to add the beaten egg slowly in a circling motion into the soup.  Don’t drop the egg in one spot all at once.  The soup should be very hot, almost boiling, but not rolling before adding the egg.  We used Mitsuba for an accent of refreshing flavor and color, but you can use spinach or green onion if you can’t find Mitsuba.

Kakitamajiru is easy to make with simple ingredients.  If you want something other than Miso soup, try this one!

Hasil gambar untuk Kakitamajiru

Kakitamajiru Recipe

Ingredients :

Hasil gambar untuk Kakitamajiru

3 cups Dashi or Ichiban Dashi

1 Tbsp Soy Sauce

1 Tbsp Sake

1/4-1/2 tsp salt

1/2 bunch Mitsuba

1 tsp Katakuriko potato starch or cornstarch

1 Tbsp water

1 egg

Instructions :

Hasil gambar untuk Kakitamajiru

Put Dashi in a pot and heat at medium heat until just before boiling. Season Dashi broth with Soy Sauce, Sake, and salt.

Chop the Mitsuba and dissolve Katakuriko in 1Tbsp of water, add to the soup, and stir very well.

Hasil gambar untuk Kakitamajiru

Beat an egg in a small bowl. Slowly pour the egg into the soup in circling motion starting from the center, spiraling outward.

Pour the soup into a bowl and sprinkle with Mitsuba.

Senin, 12 Oktober 2015

Tororo Soba is a Soba noodle dish with gooey grated Nagaimo

Hasil gambar untuk tororo soba

Tororo Soba is a Soba noodle dish with gooey grated Nagaimo.  It could be hot or cold although the recipe here is a cold version. Zaru Soba is the very basic and most popular soba dish, but Tororo Soba is also found on the menu at any Soba restaurant in Japan.  Cold Tororo Soba is a great dish during summer for Nagaimo’s rich nutrition and coolness of Soba when you don’t have much appetite from heat outside.

Soba is a popular Japanese food in the US, and dried Soba noodles can be found at most supermarkets here.  One of the reasons why Soba is popular here is because Soba is much healthier than other noodles made from refined flours.  Soba has fewer calories and more nutrients such as Vitamin B, various minerals, and fiber.  Another reason is that Soba doesn’t contain any gluten.  Recent interest in gluten free diets may also be contributing to the popularity of Soba noodles.

Nagaimo is one of a very few potatoes that can be eaten raw.  It is slimey when the skin is peeled, and it has a crispy texture when it is eaten cut; however, it has totally a different texture when grated.  It is gooey and slimey, and you may not like the mouth feel at first if you’re not use to that kind of vegetables.  Nagaimo contains a lot of nutrients such as potassium, vitamins, minerals, and enzymes that helps digestion too. All in all, Tororo Soba is very good for you on top of being tasty.

Tororo Soba is often topped with a quail egg; however, it can be hard to find quail eggs here in the US.  We used a regular egg yolk here. Even though using organic eggs, there is a risk to eat raw eggs.  If you’re worried, just omit yolks from the recipe.

If you’re too hot to eat anything in summer, Tororo Soba is a quick and easy and nutritious food to make.  Try it!

Hasil gambar untuk tororo soba


Tororo Soba Recipe

Prep Time: 15 minutes

Cook Time: 5 minutes

Yield: 2 servings

Ingredients :

150-200g dried Soba

5 Shiso leaves or 2 green onions

300g Nagaimo

2 egg yolks

Mentsuyu

Wasabi

Instructions :

Cook dried Soba according to the package. Rinse under running water and strain well.

While cooking Soba, slice Shiso leaves thin and finely. Grate Nagaimo with fine grater. Separate egg yolks and whites.

Hasil gambar untuk tororo soba

Place cooked Soba in a deep bowl, add grated Nagaimo, a yolk, and Shiso. Pour Mentsuyu (diluted by the equal amount of water).

 Add a little Wasabi if you like.